Run Workflow Using Short Cut Ribbon Button (Without Coding)
Challenge:
Don't you find users are always complaining about the 'number of
clicks' it take to do things? Although, the standard Run Workflow
button provides a lookup to find a particular workflow to run, it
would be nice to provide 'short-cut' buttons to run commonly used
workflows.
Solution:
There are too many solutions posted that involve using JavaScript web resources to perform this task, however there is a much easier way
that requires without code. This method uses the existing JavaScript and
has the benefit of providing the same user experience as you see
when using the out of the box functionality in CRM.
The following solution demonstrates adding a Custom Ribbon Button to a
Workflow already created on to the Contact form and grids. The Grid
button will run a workflow on the selected records.
- Open the Process Centre Workflow in the designer and press
'F11' to show the address bar - then copy the URL.
It should look something like:
http://<Server>/<OrgName>/sfa/workflow/edit.aspx?id=%7b<WorkflowID>%7d
- Extract the Workflow ID from the url and save for later.
- Create a solution and add the Contact Entity along with the
ribbon button images that you want to use on your button.
- Load the new solution into the Ribbon Workbench.
- In the 'Solution Element' panel, add the following
EnableRules and mark each one as 'IsCore=True' in the
properties.
-Mscrm.SelectionCountAtLeastOne
-Mscrm.RunWorkflowSelected
-Mscrm.FormStateNotNew
-Mscrm.RunWorkflowPrimary
6. Under 'Commands' in the Solution Elements Panel, add two
Commands and name them something like:
-new.contact.Form.RunWorkflow1.Command
-new.contact.Grid.RunWorkflow1.Command
7. Right-Click on the Command
'new.contact.Form.RunWorkflow1.Command' and select 'Edit Enable
Rules'
Add the following Enabled Rules:
-Mscrm.FormStateNotNew
-Mscrm.RunWorkflowPrimary
This will ensure that the button is only enabled if workflows
can be run on the current record.
8. Right-Click on the Command
'new.contact.Grid.RunWorkflow1.Command' and select 'Edit Enable
Rules'
Add the following Enabled Rules:
-Mscrm.SelectionCountAtLeastOne
-Mscrm.RunWorkflowSelected
This will ensure that the button will only be enabled if there
are records selected and they can have workflows run on them.
9. This is where the magic happens:
Right-click on the Command 'new.contact.Grid.RunWorkflow1.Command'
and select 'Edit Actions'
Add a JavaScript Command and set the following properties:
10. Rigth-click on the Command 'new.contact.Form.RunWorkflow1.Command'
and select 'Edit Actions'
Add a JavaScript Command and set the following properties:
Adding the Buttons
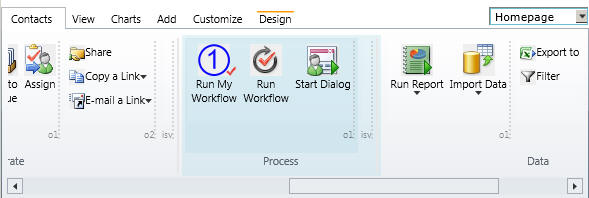
- Select the 'Home Page' ribbon using the drop down in the top right of the design surface.
- Drag a new button on to the 'Process' Group
Give your buttons an image, and select the Command
'new.contact.Grid.RunWorkflow1.Command'
3. Select the 'SubGrid' ribbon and drag a new button into the
'Process' Group
Give your buttons an image, and select the Command
'new.contact.Grid.RunWorkflow1.Command'
4. Select the 'Form' ribbon and drag a new button into the
'Process' Group
Give your buttons an image, and select the Command
'new.contact.Form.RunWorkflow1.Command'
5. Click 'Publish'.
Thank You